Connecting GitHub to AWS CodePipeline via CodeStar
🔗 Setting Up GitHub CodeStar Connection
📋 Overview
AWS CodeStar Connections provides a secure way to connect your GitHub repositories to AWS CodePipeline without storing OAuth tokens. This modern approach:
- ✅ Improves security by eliminating the need for personal access tokens
- ✅ Simplifies management with centralized connection handling
- ✅ Enables fine-grained access control to specific repositories
🛠️ Step-by-Step Implementation
1️⃣ Create the CodeStar Connection (CLI)
Run the following command to create a new GitHub CodeStar Connection and save the ARN to a variable:
# Create the connection and save the ARN to a variable
CONNECTION_ARN=$(aws codestar-connections create-connection \
--provider-type GitHub \
--connection-name my-github-connection \
--query 'ConnectionArn' \
--output text)

# Verify the connection ARN was captured correctly
echo $CONNECTION_ARN

# Save the connection ARN to a file for later use
echo "export CONNECTION_ARN=$CONNECTION_ARN" > connection-config.sh
✅ Expected Output:
arn:aws:codestar-connections:us-west-2:123456789012:connection/your-connection-id2️⃣ Authorize the Connection (Manual Step)
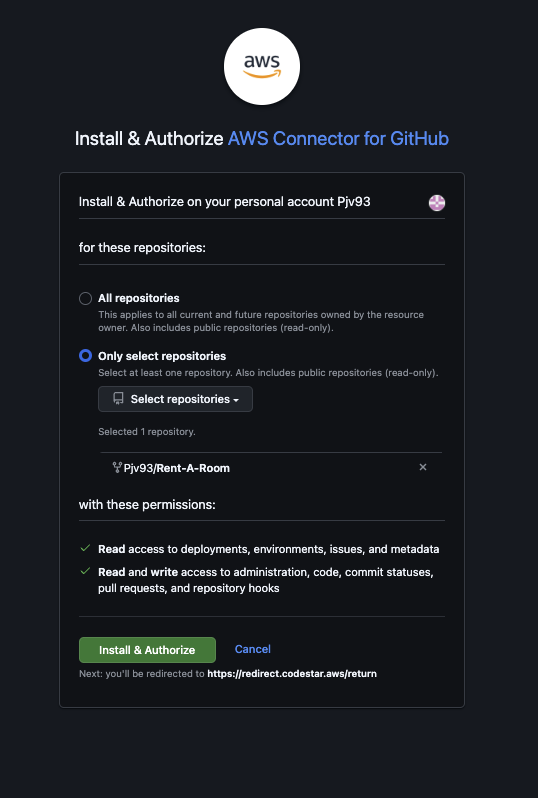
The final authorization step must be completed in the AWS Console:
- Navigate to the Developer Tools > Connections section in the AWS Console
- Locate your newly created connection (named “my-github-connection”)
- Click “Update pending connection”
- You will be prompted to sign into your GitHub account
- IMPORTANT: After signing in, make sure to click on “Install a new app”

- You will be prompted to sign into GitHub again
- On the installation page, you can choose between:
- All repositories in your GitHub account
- Only select repositories (recommended)
- Select “Only select repositories” and click the dropdown
- Search for the “Rent-A-Room” repository you forked
- Select the repository and click “Install and Authorize”
-
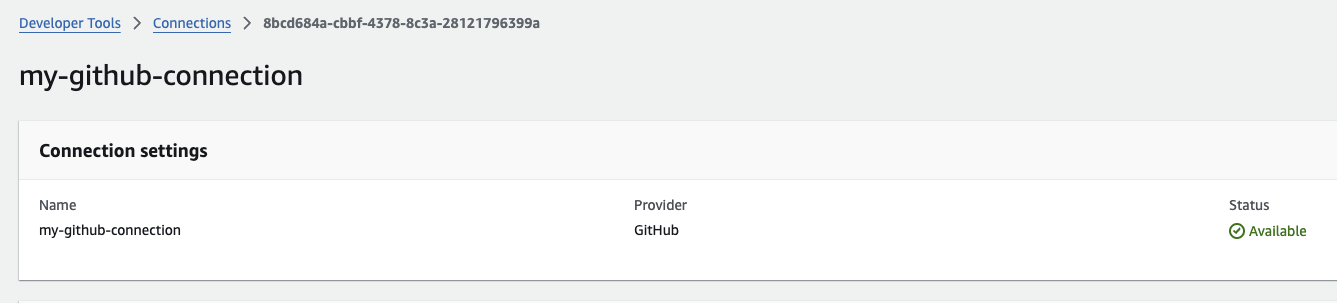
Click on Connect.
-
Once completed, you’ll be redirected back to AWS and the connection status should change to
Available
3️⃣ Get Your GitHub Username Automatically
Let’s use the GitHub CLI to get your actual GitHub username:
# Get your GitHub username using GitHub CLI
GITHUB_USERNAME=$(gh api user -q '.login')
echo "Your GitHub Username: $GITHUB_USERNAME"

# Verify this is correct
read -p "Is this your GitHub username? (y/n): " CONFIRM
if [[ $CONFIRM != "y" && $CONFIRM != "Y" ]]; then
  read -p "Please enter your GitHub username: " GITHUB_USERNAME
fi

# Set repository and branch information
GITHUB_REPO="Rent-A-Room"
GITHUB_BRANCH="main"

echo "GitHub Username: $GITHUB_USERNAME"
echo "GitHub Repository: $GITHUB_REPO"
echo "GitHub Branch: $GITHUB_BRANCH"
4️⃣ Create and Push Dockerfile and Required Files
Before we deploy our pipeline, we need to create and push a Dockerfile and related configuration files to our GitHub repository.
# Make sure you are in the Rent-A-Room directory
cd /workshop/Rent-A-Room

# Commit and push all files to GitHub
git add Dockerfile nginx.conf src/ package.json
git commit -m "Add Docker configuration files for CI/CD pipeline"
git push origin main

echo "✅ Successfully pushed Dockerfile and configuration files to GitHub repository"
5️⃣ Download and Deploy the CloudFormation Template
Now, let’s download and deploy the CloudFormation template that will set up our complete CI/CD pipeline:
# Download the CloudFormation template using curl with better error handling
curl -s -f https://raw.githubusercontent.com/aws-samples/aws-modernization-with-docker/main/static/infrastructure/ecs-pipeline-setup.yaml -o ecs-pipeline-setup.yaml || { echo "Failed to download template"; exit 1; }
# Verify the template was downloaded correctly with more robust checking
if [ -s ecs-pipeline-setup.yaml ]; then
echo "✅ Template downloaded successfully. Verifying content..."
grep -q "AWSTemplateFormatVersion" ecs-pipeline-setup.yaml && echo " ✅Template validation passed" || echo "❌ Template validation failed"
else
echo "❌ Template download failed or file is empty"
exit 1
fi
# Create Docker Hub credentials in Secrets Manager
echo "Checking for existing Docker Hub credentials in Secrets Manager..."
if ! aws secretsmanager describe-secret --secret-id dockerhub-credentials &>/dev/null; then
echo "Docker Hub credentials secret not found. Creating new secret..."
# Check if environment variables are set
if [[ -z "$DOCKER_USERNAME" || -z "$DOCKER_TOKEN" ]]; then
echo "Docker Hub environment variables not set."
read -p "Enter your Docker Hub username: " DOCKER_USERNAME
read -s -p "Enter your Docker Hub token: " DOCKER_TOKEN
echo
fi
# Create the secret with the provided credentials
aws secretsmanager create-secret \
--name dockerhub-credentials \
--description "Docker Hub credentials for CI/CD pipeline" \
--secret-string "{\"DOCKER_USERNAME\":\"$DOCKER_USERNAME\",\"DOCKER_TOKEN\":\"$DOCKER_TOKEN\"}"
echo "✅ Docker Hub credentials secret created successfully"
else
echo "✅ Docker Hub credentials secret already exists"
fi
# Deploy the CloudFormation stack with progress feedback
echo "Deploying CloudFormation stack..."
aws cloudformation deploy \
--template-file ecs-pipeline-setup.yaml \
--stack-name docker-workshop-pipeline \
--parameter-overrides \
GitHubOwner=$GITHUB_USERNAME \
GitHubRepo=$GITHUB_REPO \
GitHubBranch=$GITHUB_BRANCH \
CodeStarConnectionArn=$CONNECTION_ARN \
--capabilities CAPABILITY_IAM CAPABILITY_NAMED_IAM \
--no-fail-on-empty-changeset
# Check the deployment status with improved output formatting
echo "Checking deployment status..."
STATUS=$(aws cloudformation describe-stacks --stack-name docker-workshop-pipeline --query "Stacks[0].StackStatus" --output text)
echo "Stack status: $STATUS"
if [ "$STATUS" == "CREATE_COMPLETE" ] || [ "$STATUS" == "UPDATE_COMPLETE" ]; then
echo "✅ Deployment successful!"
# Get the pipeline URL for easier access
PIPELINE_URL=$(aws cloudformation describe-stacks --stack-name docker-workshop-pipeline --query "Stacks[0].Outputs[?OutputKey=='PipelineURL'].OutputValue" --output text)
echo "🔗 Pipeline URL: $PIPELINE_URL"
else
echo "⚠️ Deployment status: $STATUS - Check the AWS Console for more details"
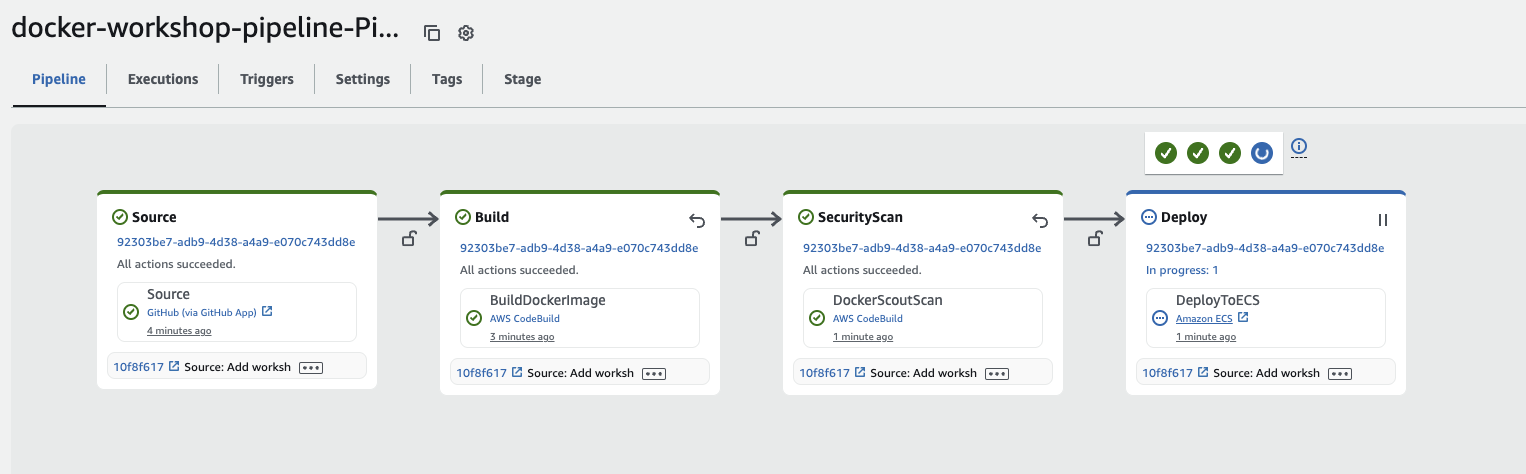
fiThis CloudFormation template will automatically create:
- A CodeBuild project with the appropriate buildspec configuration
- A CodePipeline with Source, Build, and Deploy stages
- All necessary IAM roles and permissions
- An ECS cluster and service for deployment
6️⃣ Access the website from ECS using the Load Balancer
After the CloudFormation deployment, you’ll see the pipeline progress through the Source, Build, Security Scan, and Deploy stages.
Click here to open CodePipeline in the Console and select your pipeline.
Once the pipeline is completed, you can verify the running website hosted by ECS by accessing your application URL through the load balancer:
# Get the load balancer DNS name
ALB_DNS=$(aws elbv2 describe-load-balancers \
    --names rent-a-room-alb \
    --query 'LoadBalancers[0].DNSName' \
    --output text)

echo "✅ Application URL: http://$ALB_DNS"
echo "Note: Your browser may show a security warning since we're using HTTP. Click 'Advanced' and 'Continue' to proceed."
This is much better than using the task’s IP address because:
- The load balancer DNS name is stable and won’t change when tasks restart
- Traffic will be distributed across all healthy tasks
- Health checks ensure you only access healthy containers
🔍 How It Works
- Connection Creation: AWS generates a unique connection identifier
- Manual Authorization: You authenticate with GitHub and grant specific permissions
- Username Retrieval: GitHub CLI retrieves your actual GitHub username
- Connection Storage: AWS securely stores the connection details
- Pipeline Integration: The connection ARN and your GitHub information are used in your pipeline configuration
⚠️ Troubleshooting
If you encounter issues:
-
Lost Connection ARN: If you lose your terminal session or the CONNECTION_ARN variable, you can retrieve it with:
# List all connections aws codestar-connections list-connections --query "Connections[?ConnectionName=='my-github-connection'].ConnectionArn" --output text # Save it to the variable again CONNECTION_ARN=$(aws codestar-connections list-connections --query "Connections[?ConnectionName=='my-github-connection'].ConnectionArn" --output text) # Update the config file echo "export CONNECTION_ARN=$CONNECTION_ARN" > connection-config.sh -
Ensure your GitHub account has admin access to the repository
-
Check that the connection status shows as Available in the AWS Console
-
Verify that your AWS CLI has the correct permissions to create connections
-
If GitHub CLI commands fail, ensure you’re authenticated with
gh auth login -
If you get an error about the repository not being found, verify that you’ve forked the Rent-A-Room repository to your GitHub account
-
If you can’t access the application via the load balancer:
- Check that the target group has healthy targets (EC2 Console → Target Groups)
- Verify the security groups allow traffic between the ALB and ECS tasks
- Make sure your browser isn’t blocking HTTP content
✅ Summary
🚀 Step 1: Create a GitHub CodeStar Connection via AWS CLI and save ARN to variable
🔗 Step 2: Authorize the connection manually in AWS Console, selecting only the “Rent-A-Room” repository
🔍 Step 3: Automatically retrieve your GitHub username using GitHub CLI
📄 Step 4: Create and push Dockerfile and configuration files to your GitHub repository
📦 Step 5: Deploy CloudFormation with your GitHub information and connection ARN
🌐 Step 6: Access your application through the load balancer’s stable DNS name
This approach ensures secure authentication between AWS CodePipeline and GitHub without storing OAuth tokens manually, following AWS security best practices.
In the next section, we’ll understand how our CI/CD pipeline is configured to integrate Docker Build Cloud, Docker Scout, and Amazon ECS deployment.